If you're posting images online, and who isn't these days, it pays to know how to re-size images so they aren't bandwidth hogs. Photoshop makes this easy, but like all things related to Photoshop, there are a few subtleties that make big differences in the result. In this tutorial, I will re-size a photo, then save it as a JPEG for posting to a blog or website.
Before we get started, I want to say a couple of things about resolution. This subject is little understood outside the computer graphics and print worlds, but it's an important thing to understand.
An image that has a resolution of 300 pixels per inch (ppi), if it is 1 inch by 1 inch in dimensions, will contain 900 pixels. When printed on most printers, it will print at 1 inch by 1 inch. On screen, however, at 100% magnification, it will look much larger. That's because computer monitors (typically) have a resolution of between 72 and 96 pixels per inch. Therefore, our 300 pixel wide image at 300 ppi will appear to be more than 3 times as wide on screen as when it prints.
For print, you usually want the most pixels you can get. This means a large number of pixels both across and down in your image. The more pixels, the better continuous-tone images like photographs will print. But the large number of pixels has a price: the computer has to store data for each and every pixel in your photo, with multiple bits for the three color channels (red, green and blue), as well as information about luminance (the tonal range) and transparency (usually referred to alpha). Image files intended for print are usually quite large (in terms of file size), even if their printed size is small.
We don't need all of that weight for an online image, due to both storage issues (your uploaded photo is just a file on a server somewhere) and bandwidth (how much data needs to be transmitted to a computer to view an online image). Plus, the screen resolution of less than 100 ppi will display much smaller images at what appears to be "normal" size, although if you print that same image, it will be about 1/3 of the size it was on-screen.
Fortunately, the internet is utterly non-committal about the resolution of an image (the ppi). The internet only cares about pixel dimensions—how many pixels wide and how many pixels tall is the image?
So, now that I've diverted into the murky world of image resolution, let's forget about it and concentrate only on the pixel dimensions of our image.
I've opened the photo I'll be working with in Photoshop. I'm using Photoshop CS2 on a Mac, but the techniques are the same for Windows.
Because I shoot all my digital photos at the maximum size allowed by my camera (so I can print nice sharp versions at the largest possible size if I choose), I know that this image is going to be too large to display on-screen. If we go to Image>File Size…, we can examine the resulting dialog box.
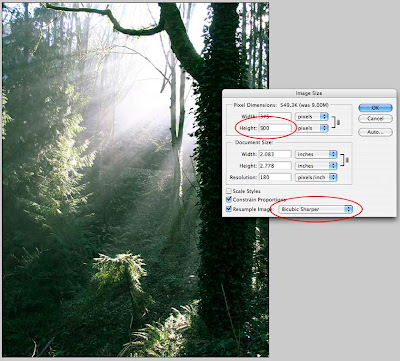
The image's dimensions are shown in the top box, conveniently labeled "Pixel Dimensions," along with the size of the file (in this case, 9MB). I usually have my units of measure set to pixels in Photoshop, so that's what comes up here, but if you don't see "pixels" next to the width and height boxes, use the drop down buttons to change it.
I want people to be able to see the entire photo without scrolling in their browser window, so that gives me a guideline for the height. You can search the web for safe dimensions by browser, but I can't be bothered trying to accommodate the multitude of browsers now available, so I'm going to try 500 pixels for the height. People with small screens are used to scrolling, anyway, so they'll get the experience they're used to.
Before changing the height, make sure the "Constrain Proportions" box is checked. This will ensure that when we change the height, the width will adjust appropriately. We can completely ignore the second section of this dialog box, because we're not concerned with resolution or document size for this exercise, only the pixel dimensions.
Before clicking OK, we need to change one other setting, and that is the bottom control labeled "Resample Image." The default setting for this control, which determines how Photoshop decides which pixels to throw away while maintaining the visual integrity of your image, is Bicubic, and that is fine for a default. I get better results when shrinking an image, however, by selecting "Bicubic Sharper" from the dropdown. Conversely, when enlarging an image (more on this in a minute), I select "Bicubic Softer." I don't understand the technical reasons why this gives me better results, I just like the results I get. Now click OK.
OK, we've re-sized our photo to a web-friendly size. Now, we need it in a format that can be displayed on the web. For photographs, this usually means either JPEG or PNG (an open-source algorithm developed to replace JPEG, which is a patented process). These are both compression algorithms that are used to shrink file size (remember storage and bandwidth). Both are what are known as "lossy" algorithms, meaning they produce a smaller file size by throwing away data. We want to control this process to ensure the highest possible image quality at reasonable file sizes.
If we started with a JPEG (which is the most common format used by point-and-shoot digital cameras), it would be tempting to just hit File>Save now. We could also use File>Save As… and then choosing .jpg or .png in the file type drop-down, but neither of these methods gives us any control at all.
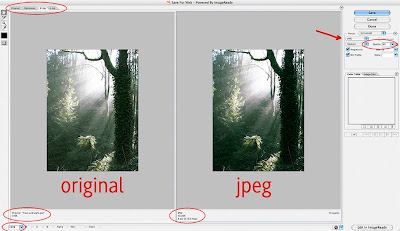
Instead, use File>Save for web…, which will then open some controls we can change. The Save for web… dialog box has several important features. In the upper left, we can select to display only the original image, only the compressed image (Photoshop calls the compressed image "Optimized"), or display them side by side. If you want to try out several different levels of compression, you can click the 4-Up tab, then set different levels of compression for each window. I usually find that the 2-Up configuration works fine. It lets me keep an eye on my original (left pane) as well as the compressed version (right pane). In the lower left corner, you can change the magnification of the previews in case you need to really see what's happening up close. I usually leave it at 100% because that's the size I'll be viewing it once it's online.
In the upper right, there is a dialog box with several controls. Select JPEG or PNG from the drop down (PNG-8 will result in smaller files than PNG-24, but will also throw out more data in order to achieve that small file size). For photos, these are really the only two options you should consider, and I won't discuss the other options in this tutorial.
I've selected JPEG, then played with the Quality setting. The information at the bottom of the right-hand image shows me what the resulting file size will be based on my settings. I usually look for a balance of image integrity and file size, remembering that many users won't often wait for a large image file to download to their screen, but will click away after just a few seconds. When I have the settings the way I want them, I click OK, then give the JPEG a file name.
That's it. My JPEG is now a svelte 40k in size and still looks good. I wouldn't print an image that small, but it's fine for viewing on a screen.
Images of the same pixel dimension can end up different sizes after saving as a JPEG. The "busier" the image, the larger the final file size. This is because the JPEG algorithm looks at the edges between things to determine what it can toss. The more edges (say, in a crowded street shot with lots of buildings, windows, and people), the larger the file size will be. The Save for web… dialog lets you see what your final image will both look like as well as how large it will be (file size), while letting you control both. It's a great tool.
Now, what about enlarging an image? Enlarging the pixel dimensions of an image is problematic to say the least. When you shrink an image, the computer is throwing away pixels; when you enlarge an image, the computer has to invent what it thinks the new pixels should look like. Enlarged images always—repeat, always—suffer a loss of sharpness. It rarely results in a quality image. There are third-party plug-ins and stand-alone programs that purport to do this with greater accuracy, but they are still inventing pixels based on what they start with. I don't recommend enlarging images if the end result is to be crisp and detailed. If your goal is to get something fuzzy or pixelated, and sometimes that's what I need for artistic reasons, then go for it.
So that's it. Have fun!
Thursday, August 27, 2009
Thursday, August 20, 2009
Cooking: Cabbage Koftas
One of my favorite cooking web sites is Manjula's Kitchen. I especially love watching her knead doughs for rotis, parathas, and other Indian breads, using just her right hand. But what a hand! So expressive.
I've made several of her recipes, although I usually dial back the chilies to better suit our palates.
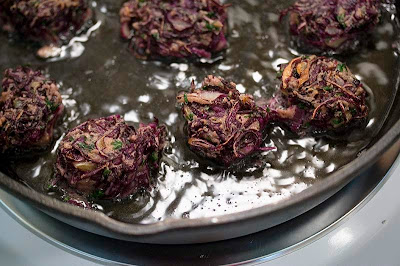
Recently, she posted a video about making Cabbage Koftas, fritters made from mostly cabbage, with some seasonings and a binder. Manjula serves her koftas in a spicy tomato gravy, but I wondered what they would be like in a mixed vegetable curry with coconut milk. Dinner with friends presented the perfect opportunity. I used garbanzo flour instead of gram flour (which is made from hulled black lentils) and a modified frying technique. Here's my revised recipe.
Cabbage Koftas
makes about 16 koftas
2 cups finely shredded cabbage (I used red cabbage)
1 hot chili, seeded and chopped (I used a Santa Fe chili; jalapeño or serrano would work well, too)
2 tablespoons chopped cilantro
1 tablespoon chopped ginger
1 teaspoon whole cumin seed (or use 3/4 teaspoon ground cumin)
1 teaspoon kosher salt
3/4 cups garbanzo flour
oil for frying (I used sunflower oil; coconut oil would work beautifully, too)
Begin heating oil over medium-high heat in a cast-iron or stainless steel skillet. There should be 1/2 inch of oil in the pan.
Combine cabbage, chili, cilantro, ginger, cumin seed, salt and flour in a bowl and combine. Using your hand, press the mixture together, squeezing as you go, until the cabbage exudes enough moisture for the whole thing to hold together. Keep at it—this can take a few minutes.
Test the oil by dropping a small ball of the "dough" into it. The oil should start to bubble around it.
Form small ovals of the mixture by squeezing them and patting them into shape, then gently lay them in the hot oil. Continue with as many as will fit in the pan without them touching—if you crowd them, things will steam, not fry. Leave them alone, bubbling away, for a couple of minutes, then gently turn them. I just used a table fork for this. If you try to turn them before the bottom has crusted, they will break.
Continue cooking on the other side until it, too, is crisp and golden brown. Press the ovals lightly with the tines of the fork—when they feel solid, they're done. Remove to a plate lined with a paper towel, then continue cooking the remaining mixture until they're all fried.
These are utterly delicious to eat out of hand and would make a great appetizer or first course, served perhaps with a fresh chutney. Frankly, they were so good, I don't even think that is necessary.
I used them in a different fashion, however, placing four of them in the bottom of the dish before serving a luscious vegetable curry over and around them. The curry contained lots of onion, garlic, ginger, fresh turmeric, chopped chilies, carrots, yams, cauliflower and green beans, plus coconut milk. Seasoned liberally with home-made curry powder, it was sublime.
The delightfully chewy, rich-tasting koftas were like little bundles of treasure. I'll definitely be making these again, soon.
Wednesday, August 19, 2009
On Eating Roasted Melon Seeds
While cleaning the seeds out of an orange-flesh honeydew melon recently, I found myself wondering if they could be roasted, like pumpkin seeds. After all, melons belong botanically to the same family (along with other squashes, cucumbers, and gourds), and roasted pumpkin seeds are delicious, so why not melon seeds?
It turns out that it's me that's behind the curve, because roasted melon seeds are consumed across much of the Middle East and Asia. I even found ready-to-eat, roasted, salted melon seeds available for on-line order.
The technique couldn't be simpler. Rinse away all of the pulp (that which is not seed, in other words), soak for awhile in heavily salted water, drain, and roast in a dry skillet until golden and puffed. Let cool.
Now comes the meditative part. These seeds are small, and they must be "shelled" to reveal the tiny, nutty germ inside. (I suspect that larger-seeded varieties provide the seeds for roasting in other countries.)
Holding a seed on edge, I bit down lightly on the pointy end until it popped open slightly, a surprisingly easy and, for some reason, delightfully sensual activity. Then, using my fingernails, I pried the seed apart to reveal…sometimes nothing, sometimes a tiny kernel, sometimes a surprisingly plump morsel nestled inside.
Eaten one at a time, the seeds had a delicious flavor, slightly salty and nutty. You could shell a cup of them and only end up with a tablespoon of edible bits.
So why bother?
I bothered (and I eventually ate every single seed) because I found the process quite meditative. I would sit at the table after dinner and go repetitively through the few steps required to open these diminutive seeds, an activity that coaxed me to draw my attention down from the sometimes hectic swirl that I whip up in my brain, to focus, with purpose, on gently opening a single seed. Sometimes there was a reward inside, and sometimes there was not. What a great lesson in attachment!
Eating melon seeds, I have decided, is not so much about the outcome (the kernels) as it is about the process, how we go about getting where we're going. And that's just as important as the finish line.
I told my sweetie I was getting in touch with my inner junco; he nodded gently in that way he has that means "How did I end up with someone this strange?"
Luckily for me, he likes juncos.
Tuesday, August 18, 2009
The Fifth Metatarsal
This is a boot cast. It is on my right foot. It is on my right foot because I might have an Avulsion fracture of the fifth metatarsal. This does not make my foot happy.
Fractures of the fifth metatarsal, the long bone that runs along the outside of the foot, are evidently common. This bone is shaped differently than other metatarsals—it has a little protrusion that sticks out where the metatarsal meets the tarsal. An Avulsion fracture occurs right across this protrusion, as if the bone was trying to rid itself of this odd little bump.
Even though the X-rays didn't show a fracture, hairline cracks may have occurred. Time will tell. The boot cast, which will be my constant companion (except for sleeping and showering) for the next 7-10 days, is needed in case there is a crack. Not wearing it could lead to an actual fracture, and that means a much less comfortable cast.
Avulsion fractures apparently happen when the metatarsal is stressed, particularly when the foot is twisted inward. I stepped on a step wrong, and then the pain started.
Fortunately, there was Vicodin for sleeping last night, and today it's already better. The anti-inflammatory benefits of the way we've been eating have paid off in a big way—today, there is no swelling or redness at all. Hooray for anti-oxidents!
UPDATE 082509: Not broken, but possibly bruised. The boot cast will be coming off for longer periods of time over the next week. Best of all—no hard cast. Yay!
Sunday, August 9, 2009
Cooking: Wheat-Free, Sugar-Free Muffins
"What!!?"
Take a deep, cleansing breath or two. Better now?
I've posted previously about some of the dietary changes we've been making of late. Less a diet than an entirely different way of thinking about what we put in our bodies, it's had some remarkable effects already, particularly for me.
We kept hearing about this "anti-inflammation" diet craze that seemed to be sweeping the island. Hey, it's not that big an island; word travels fast. What was amazing was just how many people we knew or met who had taken the classes and experienced a wide range of relief from many common symptoms. Between my sweetie's arthritis and my chronic digestive and allergy problems, as well as being overweight, there were many compelling reasons to check it out.
In the course of taking the classes (if you live in the Seattle area you might want to check them out at this web site), one of the recipes that was provided was for Joanne's Muffins, made with no wheat and no sugar. Intrigued, I whipped up a batch and, somewhat surprised, we found we like them.
Being an inveterate tinkerer in the kitchen, however, I immediately began thinking of slight alterations. We really like this version, which omits the olive oil completely (because I forgot it, but it didn't affect the final outcome at all), and adds grated carrot, cooked quinoa, cinnamon, ginger, and both vanilla and almond extracts. Here's the revised recipe:
Joanne's Muffins, Amended
makes 12 muffins
1 cup cooked squash, pumpkin or sweet potato (I used canned organic pumpkin)
1 cup mashed ripe banana
1/2 large carrot, grated
1/2 cup cooked quinoa
1 cup chopped walnuts
4 eggs, lightly beaten until creamy
2 cups almond flour (usually sold as almond meal—keep this in the refrigerator or freezer)
1/2 teaspoon kosher salt (use less if using table salt)
2 teaspoons aluminum-free baking powder
1 teaspoon ground cinnamon
1/2 teaspoon ground ginger
1 teaspoon pure vanilla extract
1/4 teaspoon pure almond extract
pumpkin seeds
Preheat the oven to 350 degrees F. Prepare a 12-muffin pan with unbleached muffin papers and set aside.
In a mixing bowl, combine all ingredients except pumpkin seeds. Mix well. Because there is no gluten, you cannot really overmix this batter.
Using a large spoon, fill the muffin cups to the top. Place a few pumpkin seeds on each muffin.
Bake for 25-35 minutes (check them at 20 minutes). Cool in the tin on a wire rack for 5 minutes, then remove from the pan.
When completely cool, wrap the muffins individually. Keep some in the refrigerator for immediate use, and freeze the remainder in a zipper bag. To serve, rewarm in a 300 degree toaster oven.
If you are used to eating a lot of sugar (as we were), these will not taste very sweet the first time you make them. If, however, you do not eat sugar, the subtle sweetness of the banana and pumpkin is quite delicious. We like these just as they are, with some fruit, for a satisfying breakfast. Add a cold-brewed iced coffee: oh la la!
You can also add blueberries to the batter, or substitute almonds or hazelnuts for the walnuts. Substitute sunflower or sesame seeds or poppy seeds for the quinoa. And if you are trying to consume more good-quality oil, add 2 tablespoons extra-virgin olive oil to the batter.
Thursday, August 6, 2009
Cooking: Cold-Brewed Coffee
I like coffee. I like the way it tastes, I like the ritual of making it, I like the caffeine, I like the activity of drinking it.
This doesn't mean, however, that I drink a lot of coffee. I like to have three or four good coffee beverages a week, and that's it.
When I say coffee beverage, I'm not talking these days about elaborate concoctions with flavored syrups (really not much more than sugar), caramel (sugar), chocolate (more sugar) or even dairy.
Black. Straight espresso, drip or iced americano.
One thing I've learned is that when you drink coffee black, it needs to be really good coffee. That's not really a problem here in the Puget Sound region—good coffee roasters are everywhere. I'm also looking for organic, shade-grown, and "fair-trade," again, not a problem to find these days.
Recently, I've found my taste buds responding to different stimuli as a result of some major dietary changes we've made, and the double espresso I had been enjoying at the local coffee house just didn't sit well on my tongue. It suddenly seems too acidic, too tannic. What to do?
I haven't solved the problem of my weekly coffee house indulgence, but at home I've started cold-brewing coffee, and I'm really liking it.
Cold-brewing coffee couldn't be easier: simply combine ground coffee with cold water and let it sit awhile, then filter it. Here's the technique I've been using, which makes delicious coffee.
Cold-Brewed Coffee
makes enough for 2 cups of coffee or 2 iced coffees
1/3 cup medium grind coffee (caffeinated or decaf)
1 1/2 cups cold water (use filtered water for really good coffee)
Combine ground coffee and water in a jar with a lid. Give it a stir and let it sit at least three hours, and up to twelve. Strain through a coffee filter. Store the coffee extract in a glass jar or bottle in the refrigerator.
To use, mix half and half coffee extract and either hot water or cold water. This recipe is easily doubled or tripled.
Cold brewing coffee doesn't extract the acids from the coffee beans the way hot water does, so if you like the acidic bite of traditional coffee, you might not care for cold-brewed. If, however, you're looking for something with all the flavor but much more mellow, give cold-brewing a try.
By the way, if you garden, put the coffee grounds in your compost or simply bury them in the garden. They also make an excellent mulch for acid-loving plants like rhododendrons, Japanese maples, and blueberries. Studies have shown that coffee grounds may also reduce slugs, who can't handle the caffeine.
Wednesday, August 5, 2009
Cooking: Lamb with Green Beans, Artichokes, and Black Olives
This is a rich and satisfying dish that borrows from Provençal traditions.
Lamb with Green Beans, Artichoke Hearts and Black Olives
serves 2, with leftovers
2 tablespoons olive oil, divided
1/2 pound lamb sirloin, trimmed of all fat and cut into 1 inch chunks
1 large onion, in 1 inch chunks
2 small shallots, chopped (or use one of the humongous ones that they sell in the grocery these days)
2 cloves of garlic, thinly sliced
3/4 pound green beans, stem end trimmed, in 2 inch pieces
2 small red skinned potatoes, in 1/2 inch dice
1/2 cup pitted black olives, cut in half
1 cup canned artichoke hearts, cut in half
fresh marjoram
fresh thyme
kosher salt
freshly ground black pepper
In a large sauté pan or medium-sized dutch oven over medium-high, heat 1 tablespoon olive oil until it is shimmering. Add the lamb and stir it about so it gets coated with the oil. Brown the lamb, stirring it occasionally, until it is nicely browned, about 5 minutes.
Add the remaining olive oil and the onions and shallots. Season with a sprinkle of salt and some black pepper. Continue cooking until onions are just starting to soften, then add garlic, green beans and potatoes. Give everything a stir and continue cooking for a few minutes.
Add the olives, artichoke hearts, leaves from 4-5 sprigs of marjoram, and leaves from 6-8 sprigs of thyme. Add 1 teaspoon kosher salt (use less if using table salt) and 1/2 teaspoon black pepper. Cover the pan, lower the heat to medium-low, and cook until the beans and potatoes are just tender. Give it a stir a couple of times during this process.
When the beans and potatoes are tender, taste and add more salt and pepper if needed.
This was absolutely delicious. To make the plate proportional, I also served a salad made from romaine, spring greens, quartered fresh figs, diced avocado and a handful of blueberries, dressed in a red wine vinaigrette.
A wedge of watermelon for dessert was just perfect.
Cooking: Mushroom Ragout
Traditionally, a ragout is made from meat, usually with various vegetables as flavoring agents. Here's a meat-free version that tastes rich and satisfying. I served this tossed with brown rice pasta and fresh green beans, with simple herbed baked chicken and a spinach and blueberry salad.
Mushroom Ragout
serves 4
2 tablespoons olive oil
1 large onion, cut in half and thinly sliced
2 cloves garlic, thinly sliced
8 ounces button mushrooms, sliced
4 ounces oyster, white beech, chantrelle, or shiitake mushrooms, whole or sliced*
1 cup vegetable stock or water
fresh marjoram
fresh thyme
kosher salt
freshly ground black pepper
In a large sauté pan, heat olive oil over medium-high heat. When it is shimmering, add the onions. Season with a little salt and pepper and cook, stirring, until onions are soft and starting to turn golden, about 10-12 minutes.
Trim and slice the button mushrooms. Trim the "exotic" mushrooms, and cut up if large.
Add the mushrooms and garlic to the onions and cook until the mushrooms have given off all their water and they start to turn a golden color, about 10 minutes, stirring occasionally.
Strip the leaves from 2-3 sprigs of marjoram and 4-5 sprigs of thyme and add to the mixture, along with the vegetable stock or water. Reduce the heat to medium-low and simmer until the liquid has reduced by half.
Taste and adjust the salt and pepper as needed.
* I found organic white beech mushrooms at my local grocery. Look for them where Japanese produce is sold. Or, use the widely available shiitakes or other local wild mushrooms when you see them in the store or at the farmers' market. You could also substitute some reconstituted porcini mushrooms (or fresh ones, if you're lucky enough to find them).
Subscribe to:
Posts (Atom)