Before we get started, I want to say a couple of things about resolution. This subject is little understood outside the computer graphics and print worlds, but it's an important thing to understand.
An image that has a resolution of 300 pixels per inch (ppi), if it is 1 inch by 1 inch in dimensions, will contain 900 pixels. When printed on most printers, it will print at 1 inch by 1 inch. On screen, however, at 100% magnification, it will look much larger. That's because computer monitors (typically) have a resolution of between 72 and 96 pixels per inch. Therefore, our 300 pixel wide image at 300 ppi will appear to be more than 3 times as wide on screen as when it prints.
For print, you usually want the most pixels you can get. This means a large number of pixels both across and down in your image. The more pixels, the better continuous-tone images like photographs will print. But the large number of pixels has a price: the computer has to store data for each and every pixel in your photo, with multiple bits for the three color channels (red, green and blue), as well as information about luminance (the tonal range) and transparency (usually referred to alpha). Image files intended for print are usually quite large (in terms of file size), even if their printed size is small.
We don't need all of that weight for an online image, due to both storage issues (your uploaded photo is just a file on a server somewhere) and bandwidth (how much data needs to be transmitted to a computer to view an online image). Plus, the screen resolution of less than 100 ppi will display much smaller images at what appears to be "normal" size, although if you print that same image, it will be about 1/3 of the size it was on-screen.
Fortunately, the internet is utterly non-committal about the resolution of an image (the ppi). The internet only cares about pixel dimensions—how many pixels wide and how many pixels tall is the image?
So, now that I've diverted into the murky world of image resolution, let's forget about it and concentrate only on the pixel dimensions of our image.
I've opened the photo I'll be working with in Photoshop. I'm using Photoshop CS2 on a Mac, but the techniques are the same for Windows.
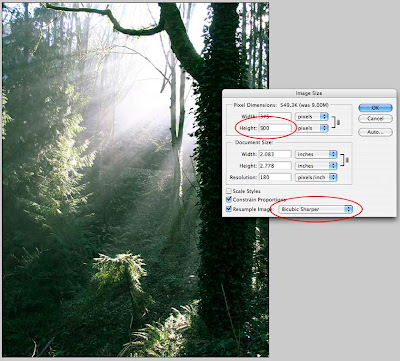
Because I shoot all my digital photos at the maximum size allowed by my camera (so I can print nice sharp versions at the largest possible size if I choose), I know that this image is going to be too large to display on-screen. If we go to Image>File Size…, we can examine the resulting dialog box.
 The image's dimensions are shown in the top box, conveniently labeled "Pixel Dimensions," along with the size of the file (in this case, 9MB). I usually have my units of measure set to pixels in Photoshop, so that's what comes up here, but if you don't see "pixels" next to the width and height boxes, use the drop down buttons to change it.
I want people to be able to see the entire photo without scrolling in their browser window, so that gives me a guideline for the height. You can search the web for safe dimensions by browser, but I can't be bothered trying to accommodate the multitude of browsers now available, so I'm going to try 500 pixels for the height. People with small screens are used to scrolling, anyway, so they'll get the experience they're used to.
Before changing the height, make sure the "Constrain Proportions" box is checked. This will ensure that when we change the height, the width will adjust appropriately. We can completely ignore the second section of this dialog box, because we're not concerned with resolution or document size for this exercise, only the pixel dimensions.
Before clicking OK, we need to change one other setting, and that is the bottom control labeled "Resample Image." The default setting for this control, which determines how Photoshop decides which pixels to throw away while maintaining the visual integrity of your image, is Bicubic, and that is fine for a default. I get better results when shrinking an image, however, by selecting "Bicubic Sharper" from the dropdown. Conversely, when enlarging an image (more on this in a minute), I select "Bicubic Softer." I don't understand the technical reasons why this gives me better results, I just like the results I get. Now click OK.
OK, we've re-sized our photo to a web-friendly size. Now, we need it in a format that can be displayed on the web. For photographs, this usually means either JPEG or PNG (an open-source algorithm developed to replace JPEG, which is a patented process). These are both compression algorithms that are used to shrink file size (remember storage and bandwidth). Both are what are known as "lossy" algorithms, meaning they produce a smaller file size by throwing away data. We want to control this process to ensure the highest possible image quality at reasonable file sizes.
If we started with a JPEG (which is the most common format used by point-and-shoot digital cameras), it would be tempting to just hit File>Save now. We could also use File>Save As… and then choosing .jpg or .png in the file type drop-down, but neither of these methods gives us any control at all.
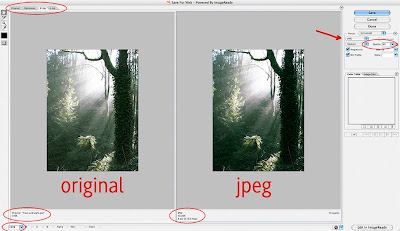
 Instead, use File>Save for web…, which will then open some controls we can change. The Save for web… dialog box has several important features. In the upper left, we can select to display only the original image, only the compressed image (Photoshop calls the compressed image "Optimized"), or display them side by side. If you want to try out several different levels of compression, you can click the 4-Up tab, then set different levels of compression for each window. I usually find that the 2-Up configuration works fine. It lets me keep an eye on my original (left pane) as well as the compressed version (right pane). In the lower left corner, you can change the magnification of the previews in case you need to really see what's happening up close. I usually leave it at 100% because that's the size I'll be viewing it once it's online.
In the upper right, there is a dialog box with several controls. Select JPEG or PNG from the drop down (PNG-8 will result in smaller files than PNG-24, but will also throw out more data in order to achieve that small file size). For photos, these are really the only two options you should consider, and I won't discuss the other options in this tutorial.
I've selected JPEG, then played with the Quality setting. The information at the bottom of the right-hand image shows me what the resulting file size will be based on my settings. I usually look for a balance of image integrity and file size, remembering that many users won't often wait for a large image file to download to their screen, but will click away after just a few seconds. When I have the settings the way I want them, I click OK, then give the JPEG a file name.
That's it. My JPEG is now a svelte 40k in size and still looks good. I wouldn't print an image that small, but it's fine for viewing on a screen.
Images of the same pixel dimension can end up different sizes after saving as a JPEG. The "busier" the image, the larger the final file size. This is because the JPEG algorithm looks at the edges between things to determine what it can toss. The more edges (say, in a crowded street shot with lots of buildings, windows, and people), the larger the file size will be. The Save for web… dialog lets you see what your final image will both look like as well as how large it will be (file size), while letting you control both. It's a great tool.
Now, what about enlarging an image? Enlarging the pixel dimensions of an image is problematic to say the least. When you shrink an image, the computer is throwing away pixels; when you enlarge an image, the computer has to invent what it thinks the new pixels should look like. Enlarged images always—repeat, always—suffer a loss of sharpness. It rarely results in a quality image. There are third-party plug-ins and stand-alone programs that purport to do this with greater accuracy, but they are still inventing pixels based on what they start with. I don't recommend enlarging images if the end result is to be crisp and detailed. If your goal is to get something fuzzy or pixelated, and sometimes that's what I need for artistic reasons, then go for it.
So that's it. Have fun!


Thanks. Handy stuff. I've got Photoshop Elements 3 but I keep putting off how to learn to use it more effectively. I do post occasionally to the web so this will help.
ReplyDelete