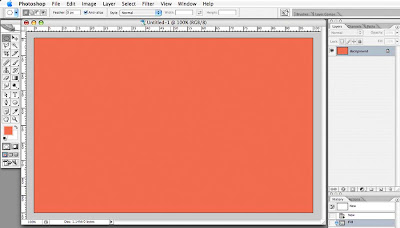
 There are several methods for creating a circular frame for a photo in Photoshop. You could, for instance, simply use the oval Marquis tool to make a circular selection of a photo, copy it, and paste it into another document, but that technique only copies the pixels inside the original circular selection. Here's one way to achieve the same thing, while giving you more options for resizing or repositioning the photo behind the frame.
(Click on any image to view a larger version; or, Control-click/right-click and open in another window or tab)
Start with a new document and fill it with whatever background color you wish. I've chosen this reddish orange.
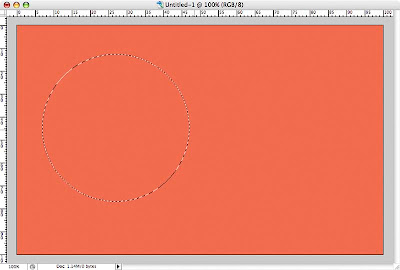 Using the oval Marquis tool (it's the top left tool in the default Tools palette; click and hold on the tool to select the oval variant of the tool from the drop-down menu), make a circular selection (hold down Shift while dragging to constrain the selection to a perfect circle). With the Marquis tool still selected, you can click inside this selection and move it to wherever you want in the document. To resize the selection, go to Select>Transform Selection and use the corner controls to alter the size; click Return/Enter when done to accept the transformation.
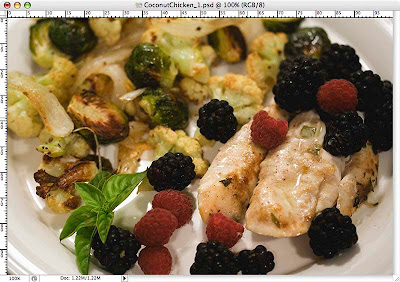 Open the photo that you want to copy, and select all (Command/Control-A), then copy it (Command/Control-C). You can close the photo file. Go back to the document that has your circular selection in it. If you've left the photo file open, go to Window>new file name to make it the current window.
Now, go to Edit>Paste into and your photo will appear inside the circular selection that you made earlier. When you paste anything into a Photoshop file, Photoshop creates a new layer directly on top of the layer that was active when you initiated the Paste action. When you Paste Into a selection, Photoshop also automatically creates a Layer Mask in the shape of your selection. Of course, your selection can be any shape you want, and Photoshop will create a mask in that shape. Nifty, no?
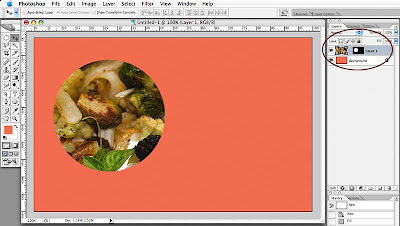 If we look at the Layers palette (if it's not already open it, display it now by going to Window>Layers), we can see that our document now has two layers: the Background layer is our original colored layer, and the next layer up contains the photo, as well as the layer mask. The layer mask reveals or hides the contents of the upper layer depending on its shape (and opacity, which we won't be dealing with in this tutorial).
In the Layers palette, we now see a thumbnail for the photo, as well as a black and white thumbnail for the layer mask. Note that the entire photo is actually there, but the layer mask is only showing us the part that is revealed by the white area of the mask. We can now resize the image, or move it around behind the mask, which gives us much more flexibility than if we had simply copied a circular selection of pixels and pasted them in.
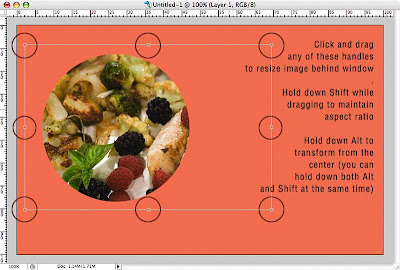 If we want to resize the image, first make sure that the layer that contains it is active (click on the photo thumbnail), then go to Edit>Free Transform (or, just press Command/Control-T). We now see the transformation box on the image, and we can click and drag the controls to resize the image, while leaving the circular mask the same.
Now, let's suppose we want to create a second circular image that's the same size as the first one. To do this, we need to copy the original circular selection that was used to create the original layer mask.
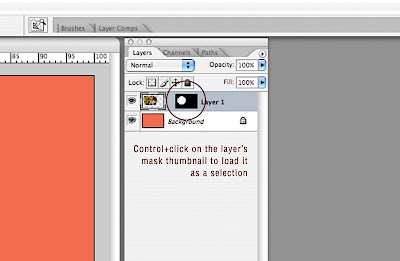
To do this, Control-click on the layer mask thumbnail in the Layers palette. This loads the mask as a selection. Using the Marquis tool (press M), we can now go back to our image and click inside the circular selection and drag it to a new location. By using the Marquis tool, we are assured of only moving the selection, and not the image inside the selection.
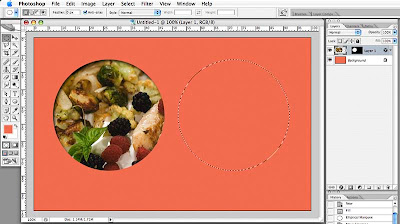
We can now paste a second image into this new selection (open a new photo, select all, copy, return to the destination image, paste into) and Photoshop will create another new layer, complete with a new layer mask. Easy!
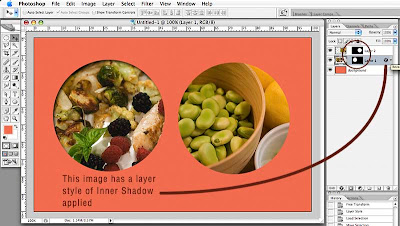 To add a little dimension to your frames, you can add a Layer Style, which I've done on the left image. To add a Layer Style, click on the image thumbnail of the layer you want to style, then go to Layer>Layer Style and select Inner Shadow (or, click on the Layer Style button at the bottom of the Layers Palette). Adjust the settings to your liking, and press OK.
If you want to move your circular frames around, you need to lock the image and its corresponding layer mask. Do this by click the space between the image thumbnail and the layer mask thumbnail; a small chain link will appear, signifying that they are now locked. You can now use the Move tool (press V) to click and drag the circles around; both the image and the mask will move. When the image and its mask are locked, you can also resize both simultaneously (Command/Control-T). To unlock the image from its mask, just click on the little chain link and you can then transform them independent of one another.
Layer masks are powerful tools, and I've just scratched the surface of what you can do with them. They are an essential tool for compositing images, and well worth your time exploring. Have fun!


thank you! seems like a pretty basic task but i couldn't figure it out lol
ReplyDelete