Having said that, I can't imagine my digital life without it. I use it nearly every day, sometimes just to play around, but most often to accomplish some specific task. In the last few years, I have been using Photoshop more and more for what it was originally designed to emulate: the tools a photographer might use to produce good-quality photographs.
This little tutorial outlines some of the basic steps I go through to improve my digital photos. I am using Photoshop CS2 on a Mac, but the techniques are the same for Windows.
First, let's take a look at the image as imported by Photoshop's Camera Raw plug-in. (Click on the image to see it larger.)
In the Camera Raw plug-in, I made sure that none of my whites were blown out (they show up red if they are) and none of the shadows are too dark (they show up blue). I did this by using the Curve feature of the plug-in, but I will write about that in another tutorial. Basically, I wanted the image to have a full range of lights and darks, and will further enhance the tonal balance now that the image is open in Photoshop.
By the way, I shoot all my photos in RAW format as it allows me to control how I correct any problems with the image capture. If you shoot in JPG format, your camera is making those choices for you. Most modern cameras do a good job with this, but I like the control.
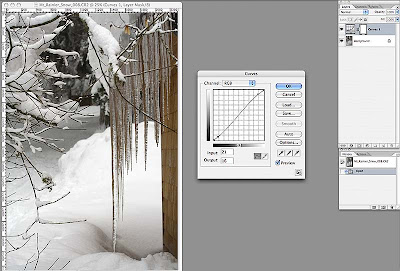
I next create a new Curves Adjustment Layer on top of the original layer (Layer>New Adjustment Layer>Curves, or use the drop-down menu at the bottom of the Layers Palette). You do have the Layers Palette open, don't you?
 I added two points to the line in the Curves box, one near the top right and one near the bottom left. I dragged the top right point up slightly to increase the brightness of the lighter tones (without affecting the very lightest tones, which are controlled by the point in the top left corner); I then dragged the point I added bottom left down a little to darken the dark tones (again, leaving the darkest tones untouched). This gentle S-curve is a great way to both increase the contrast of your image slightly, while also slightly saturating the color of your photo. If you end up with points that you don't want, just drag them off the grid and they will disappear. If you want to reset the entire thing and start over, just hold down the Option key (Windows: Alt) and the "Cancel" button will change to "Reset." A handy little trick! When you're done adjusting the tonal range of your image, click "OK."
You can also make this adjustment by just using Image>Adjustments>Curves, but then you actually alter your image's pixels. By using an Adjustment Layer, you leave the original pixels untouched.
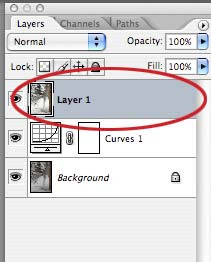
Next, I want to copy the accumulative image (the original pixels + the Adjustment Level combined) to a new layer on top of the other layers. As with many things in Photoshop, there are several ways to do this.
The way I use most often, because I love keyboard shortcuts, is to hold down the Shift-Option-Command (Windows: Shift-Alt-Control) keys, then press N, then E. This unlikely key combination copies the image of the combined layers, creates a new layer, then "stamps" the combined image onto the new layer. Pretty nifty, eh?
The second method is to press Command+a (Control+a) to select all, then press Shift-Command+c (Shift-Control+c) to copy the combined image, then press Command+v (Control+v) to paste it into a new layer. You have to use the Shift key in this combination, otherwise you will only copy the Curves Adjustment Layer, not the combined image.
The third method is hidden in the drop down menu under the little triangle at the top of the Layers Palette. Hold down the Option (Alt) key, then click the triangle and select Merge Visible from the drop-down menu. This will create a new layer with the merged contents of all the layers below it. Neat.
 Whichever method you used, you now have a new layer in the Layers Palette that combines the original layer + the Curves Adjustment Layer. Note that we still haven't touched the original image pixels, which are happily sitting on the bottom layer.
I usually do some image sharpening at this point, because I find digital photos usually need a little. The problem is that most sharpening techniques sharpen everything, including any color noise in your image.
If, however, we can manage to just sharpen the edges of elements in our photo, the eye is tricked into thinking it is in sharper focus, without resulting in grainier photos. Again, there are many ways to do this, but I usually start with this one and see how things look.
If you analyze the image, you will usually find that the eye wants areas with more contrast, ie, greater differences in light and dark, to be sharper in order for the mind to "see" the image as a whole as sharper. This is sometimes difficult to visualize, but bear with me.
The quick and dirty method I use is pretty easy. First, load the image's luminance as a selection by pressing Option-Command+~ (Alt-Control+~). Note the resulting "marching ants" on your image. What we have done is to make a selection based on the luminance of the image. Luminance is only concerned with tonal value and ignores color information. Because we are basing our selection on luminance, areas that are more "contrasty" are selected with a harder edge (less feathering) than areas that have less contrast. To see this, just press the Q key to switch into Quick Mask mode and note that the selection itself has a nice range of values (more on Quick Mask mode in a future tutorial). Press Q again to return to our image.
Next, invert the selection by pressing Shift-Command+i (Shift-Control+i). To copy the newly selected pixels to a new layer, press Command+j (Control+j). If you isolate this new top layer, it will look strange (press the eye icon next to the layer while holding down the Option (Alt) key to show only that layer; repeat to turn on all layers) but hold on.
 We're going to use one of the more arcane filters that Photoshop has to offer. Most people, when they are playing around with filters, might have dismissed the High Pass filter without realizing what it can do. Not us!
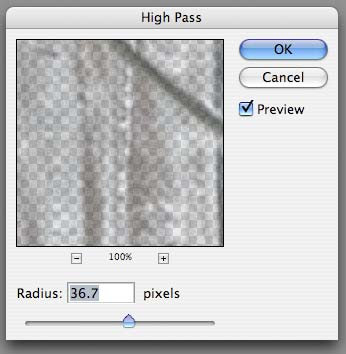
Go to Filter>Other>High Pass and play with the slider to increase or decrease the effect of the filter. If the Preview button is unchecked, check it to see the effect in real time.
Depending on the original resolution of your image and the sharpness of the original capture, you will need a higher or lower value for the radius. In general, the higher resolution the image (the more pixels), the higher the value, but again, use the preview. You can click and drag in the preview window to see other areas of your image, or change the magnification.
What I look for is emphasized edges. As you drag the slider to the right, you will see the edges bulking up, somewhat like a bad photocopy. Don't worry about the gray tone. When it's where you think it should be, click OK.
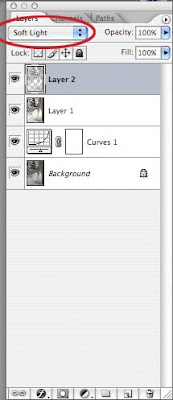
 Now, change the Blend Mode of your top layer to Soft Light. Areas that were 50% gray do not affect the underlying image. Toggle on the layer's visibility by clicking the eye icon for the layer while holding down the Option (Alt) key to see the result, which can be subtle but noticeable.
By the way, you can change the Blend Mode of a layer by another method (of course). Double click to the right of the layer's name (in our case, Layer 2) and a dialog box will open with all sorts of options for that layer. The Blend Mode drop down is near the top of that dialog box.
At this point I sometimes add a second Curves or Levels Adjustment Level on top of everything if I think it's needed.
If you're happy with your result, save your image.
That's it for this one. I'm sure there are a thousand and one other ways to accomplish what I did here, and I will also post a quick tutorial for a second method for sharpening images that has worked well for me.
Happy mousing!


No comments:
Post a Comment